Parse – Query class (table) and add values to an Array

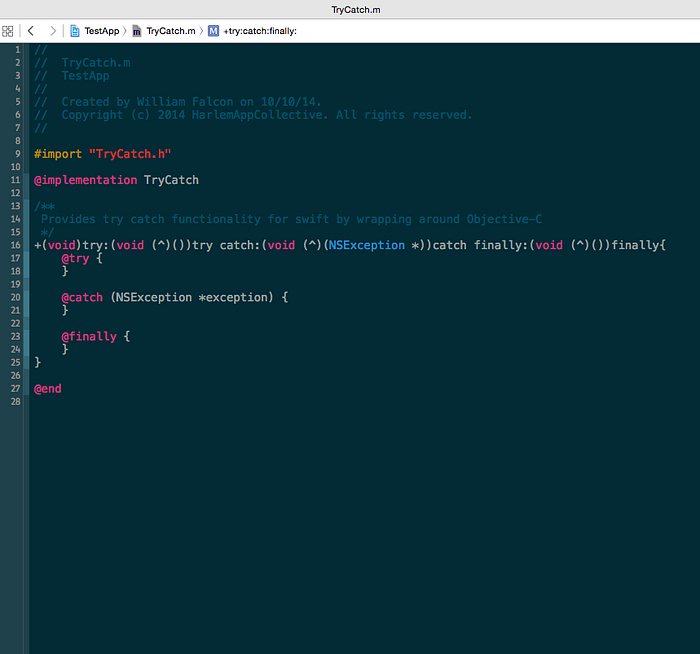
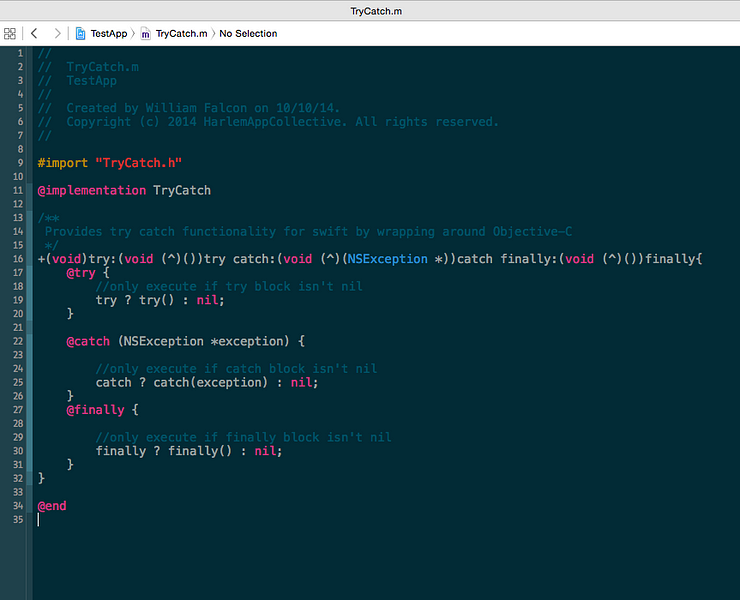
func retrieveAllItems(){

        var query = PFQuery(className:“Categories”)

        //query.whereKey(“SimpleIdentifier”, equalto: 1)

        query.whereKey(“SimpleIdentifier”, greaterThanOrEqualTo: 1)

        query.findObjectsInBackgroundWithBlock {

            (objects: [AnyObject]?, error: NSError?) -> Void in

            if error == nil {

                // The find succeeded.

                println(“Successfully retrieved \(objects!.count) scores.”)

                // Do something with the found objects

                if let objects = objects as? [PFObject] {

                    for object in objects {

                        //println(object.objectId)

                       // println(object.objectForKey(“Category”))

                        var myArray: AnyObject! = object.objectForKey(“Category”)

                        println(“The value of my array is: \(myArray))

                    }

                }

            } else {

                // Log details of the failure

                println(“Error: \(error!) \(error!.userInfo!))

            }

        }

    }

Screen Shot 2015-05-12 at 11.55.57 PM

Parse – Update Object

func updateItem(){

        var query = PFQuery(className:“Products”)

        query.getObjectInBackgroundWithId(“VHeWXBOq8G”, block: { (object: PFObject?, error: NSError?) -> Void in

            if error != nil{

                println(error)

            } else if let product = object{

                product[“Description”] = “Lots of cheese”

                product[“Price”] = 5.99

                product.saveInBackground()

            }

        })

    }

Screen Shot 2015-05-12 at 11.48.22 PM

Parse – Retrieve Objects

func retrieveItem() {

        var query = PFQuery(className:“Products”)

        query.getObjectInBackgroundWithId(“Ddjo25WWrB”, block: { (object, error) -> Void in

            if error != nil{

                println(error)

            } else {

                //println(object)

                println(object!.objectForKey(“Description”))

            }

        })

    }

Screen Shot 2015-05-12 at 11.44.38 PM

Parse – Saving Objects

func saveItem() {

       var product = PFObject(className:“Products”)

        product[“Name”] = “Candy”

        product[“Description”] = “Strawberry”

        product[“Price”] = 1.99

        product.saveInBackgroundWithBlock {

            (success: Bool, error: NSError?) -> Void in

            if (success == true) {

                // The object has been saved.

                //println(“Saved with Sucess!!!”)

            println(“Object saved with id \(product.objectId))

            } else {

                // There was a problem, check error.description

                println(“Failed”)

                println(error)

            }

        }

}

Screen Shot 2015-05-12 at 11.39.56 PM

Table Views

In order to add a Table View, follow the steps below:

1 – Add the delegate UITableViewDelegate to the ViewController class & drag and drop a “Table View” to storyboard.

class ViewController: UIViewController, UITableViewDelegate {

Screen Shot 2015-05-12 at 10.36.01 AM

}

 2 – Add the functions:

func tableView(tableView: UITableView, numberOfRowsInSection section: Int) -> Int{

    //number of rows to return in the table view

}

func tableView(tableView: UITableView, cellForRowAtIndexPath indexPath: NSIndexPath) -> UITableViewCell {

//define content to display in the table view

}

3 – Add Outlets dataSource & Delegate

Screen Shot 2015-05-12 at 10.37.04 AM

Table View filled by an Array:

import UIKit

class ViewController: UIViewController, UITableViewDelegate {

    var catArray = [“Blue”, “Red”, “Green”, “Yellow”]

    override func viewDidLoad() {

    super.viewDidLoad()

        // Do any additional setup after loading the view, typically from a nib.

    }

    func tableView(tableView: UITableView, numberOfRowsInSection section: Int) -> Int{

    //number of rows to return in the table view

    return(catArray.count)

    }

    func tableView(tableView: UITableView, cellForRowAtIndexPath indexPath: NSIndexPath) -> UITableViewCell {

    //define content to display in the table view

    let cell = UITableViewCell(style: UITableViewCellStyle.Default, reuseIdentifier: “Cell”)

    cell.textLabel?.text = catArray[indexPath.row]

        return(cell)

    }

    override func didReceiveMemoryWarning() {

        super.didReceiveMemoryWarning()

        // Dispose of any resources that can be recreated.

    }

}

How to add Try/Catch to Swift

Strategy

We’re going to build a wrapper around the traditional Objective-c try-catch and pass in Swift closures to execute as part of the code.

Steps:

  • Create a new Objective-c class. Pick NSObject as the subclass.

  • Allow Xcode to add a bridging header if you don’t already have one. The bridging header allows Swift code to access Objective-c classes imported through there.

  • Make your TryCatch class visible to the Swift project by importing the Objective-c header.

  • Declare your new try-catch function. We’re using a + to make it a class function for easy use.

+ (void)try:void(^)())try catch:void(^)(NSException*exception))catch finally:void(^)())finally;
  • Implement the function using the default Objective-c try-catch.

  • Call the closures (blocks) inside each matching part of the try-catch. Only call if the closure (block) isn’t nil.

+(void)try:void (^)())try catch:void (^)(NSException *))catch finally:void (^)())finally{
    @try {
       try ? try() : nil;
    }
    @catch (NSException *exception) {
       catch ? catch(exception) : nil;
    }
    @finally {
       finally ? finally() : nil;
    }
}

Usage

Use anywhere you need a try catch in your Swift project.

 
TryCatch.try({ () -> Void in
    //try stuff
 }, catch: { (exception) -> Void in
    //catch exceptions
 }) { () -> Void in
    //close resources
 }

Source: 
How to add Try/Catch to Swift

Navigation Bar & Tool Bar

In order to add a navigation bar (top of screen) on your application, please take the following steps:

A) Drag and drop a navigation bar into the designer, position where you like and add a title.

Capture1

B) Add Bar button item and select desired icon

Capture2

C) Add auto layout to ensure nav bar looks good in both portrait and landscape views.

Capture3

Tool Bar

A tool bar is a “nav” bar that is added to the bottom of the screen. To add a tool bar please take the following steps:

A) Drag and drop a tool bar into the designer at the bottom of the screen.

Capture4

B) If you like to add buttons to the left and right sides of the tool bar, you will need to add a “Flexible Space Bar Button Item”. After that, go ahead and add a new “Bar Button Item”.

Capture5 (2)

While Loops

Example 1:

var i = 1

while i <= 10 {

      println(i)

      i++

}

Example 2: Adding 2 to each item of an array

var arr = [2, 4, 6, 8]

var index = 0

while index < arr.count {

    arr[index] = arr[index] + 2

    index++

}

println(arr)

For Loops

Example 1:

for var i = 1; i <= 10; i++ {

      println(i)

}

Example 2: Reading values from Array

var myArr = [2,4,6,8]

for x in myArr {

    println(x)

}

Example 3: To interact with values in an array use the enumarate function.

var myArr = [2,4,6,8]

for (index, value) in enumerate(myArr) {

myArr[index] = value + 1

}

println(myArr)

If Statements

See examples below for syntax of the “if statements”:

And Example

var myName = “Alberto”

var myTime = 15

if myName == “Alberto”  &&  myTime <  1 2  {

println(“Good morning”)

} else if myName = “Alberto”  &&  myTime > 12  {

  println(“Good afternoon”)

}  else  {

  println(“What is your name?”)

}

Or Example

if myName || time <  20 {

println(“One statement is true”)

}

And = &&

Or = ||